W462AQC - 2K Pan-Tilt Indoor Wi-Fi Security Camera : Device Settings
This article provides overview of Device Settings available on the Lorex App. You can configure settings for your 2K Pan-Tilt Indoor Wi-Fi Security Camera (W462AQC) from anywhere using the Lorex App.
Device Settings Overview
From the Devices screen, tap  icon to configure device settings.
Note: Device settings differs between products. Your device settings may not include all the settings from the example below.
-
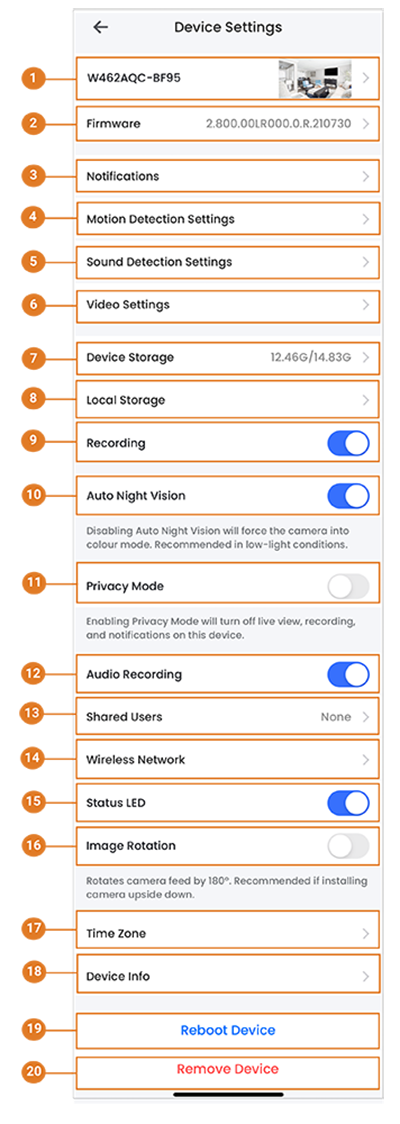
Basic Information: Tap to change the device password, set device name, change thumbnail photo, or view device ID. For full instructions, see Basic Device Settings.
-
Firmware: Tap to view the current and latest firmware version.
-
Notifications: Enable/disable notifications. For full instructions, see Notification Settings.
-
Motion Detection Settings: Enable/disable motion detection and person/vehicle detection per channel on supporting platforms. For full instructions, see Motion Detection Settings.
-
Sound Detection Settings: Tap
 icon to record video and send notifications when sound is detected at or above the preset decibel level. For full instructions on setting Sound Sensitivity, see Configuring Sound Sensitivity.
Note: Sound Sensitivity level is 90dB by default.
-
Video Settings: Tap
icon to enable HDR (High Dynamic Range).
Note: Enabling HDR optimizes video picture in high-contrast conditions such as under-lit and over-lit areas.
By default, the video quality is set to High (2x1080p HD). -
Device Storage: Tap to view or format your device storage. For full instructions, see Device Storage.
-
Local Storage: Tap to change the streaming quality or enable/disable General Record Storage. For full instructions, see Local Storage.
-
Recording: Tap
 icon to disable recording. Tap again to enable.
 -
Auto Night Vision: Tap
icon to disable Auto Night Vision. Tap again to enable.
Note: Disabling Auto Night Vision will force the camera into color mode. Recommended in low-light conditions. -
Privacy Mode: Tap
icon to enable privacy mode. Tap again to disable. -
Audio Recording: Enable/disable audio recordings per channel. (audio-enabled cameras required)
-
Shared Users: Tap to send an invitation to another Lorex App account to access the selected device. For full instructions, see Shared Users.
-
Wireless Network: Change the Wi-Fi network that is associated with the camera.
-
Status LED: Tap
icon to disable the status LED on the camera. Tap again to enable. -
Image Rotation: Tap
icon to rotate the camera feed 180°.
Note: Recommended if you are installing the camera upside down. -
Time Zone: Tap to change the time zone or to configure Daylight Savings Time. For full instructions on Time Zone, see Configuring Time Zone.
-
Device Info: View the device’s model number, device ID, IP address, and MAC address.
-
Reboot Device: Reboot your Lorex device remotely. Wait a few minutes before connecting to the device after restarting.
-
Remove Device: Remove device from Lorex App.
Note: Removing your device will not affect recordings or snapshots on your mobile device storage.